
Introduction
Facebook Marketing API
Facebook Marketing API uses OAuth 2.0. Sign up for an application on Facebook first and get an OAuth client ID and client secret.
The process of having your app approved by Facebook may take around 5 business days.
Setup & Authentication
Setting up your Partner App
Log into your Facebook account.
Create a Facebook Developer account if you don’t already have one: https://developers.facebook.com
Go to My Apps: https://developers.facebook.com/apps
Select Create App, and select Business as the app type. Complete the following sections:
App Display Name: This is the name your users will see when they grant consent to access their data.
App Purpose: Set to Clients.
Select
Create App(You will be asked to enter your password).You should be faced with a screen entitled Add Products to Your App. Under Facebook Login, select Set Up.
This should now be added. In the menu on the left, select Facebook Login > Settings.
Under Valid OAuth Redirect URIs enter
https://Your Service Domain/connector/callback
(Your service domain can be found in your Cyclr console under Settings > General Settings > Service Domain.) and select Save Changes.Under App Review on the left, select Permissions and Features. Here you're going to set the permissions you'll be asking your user for when they see the consent screen. The permissions you choose will vary depending on your use case, but you will always need advanced access to the user's public profile to allow them to sign in.
Search for
public_profile, select Get Advanced Access, and complete the confirmation screen. You will notice that Advanced Access to public_profile is granted automatically. The other permissions will require a bit more admin.For this example, we'll add the
leads_retrievalpermission, which is required if you are working with Form submissions.Once you have requested Advanced Access on this (and any other permissions), you'll be invited to Edit App Review Request. Select this, complete all the required sections, and Submit for Review.
Under Settings > Basic on the left menu, you'll be able to complete any missing sections, and copy your App ID and App Secret. Once your app has been approved by Facebook, you'll be able to use these to authenticate your App in Cyclr.
Authenticating your Facebook Cyclr Connector
Go to your Cyclr Console > Connectors > Connector Library > Facebook Marketing API > Setup.
Client ID: This is the App ID displayed after you create the Facebook app
Client Secret: This is the App Secret displayed after you create the Facebook app
Your Facebook Marketing API connector is now set up! You can test it by installing it in one of your user accounts.
Official Facebook Documentation
For reference, these links take you to Meta’s own documentation around their APIs:
Additional information
“Ad Leads” and “Form Leads” Method Categories
Both the Ad Leads and Form Leads Method Categories are copyable on the Connector Settings page of an installed Connector, allowing you to create versions of them for specific Ads or Forms.
You will need to provide an ID for the Ad or Form you’re creating the Method Category for. That ID can be obtained by calling Methods on the Connector, as described in the sections below.
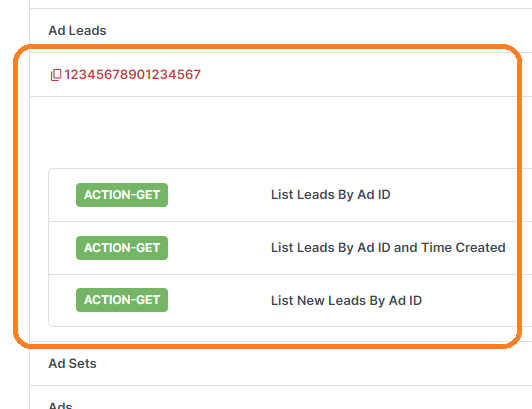
Ad Leads
When creating a new Ad Leads Method Category to work with a specific Ad, you will need to obtain an Ad ID as described here:
Use the Ad Accounts > List My Ad Accounts method to retrieve an Ad Account ID.
Use the Ads > List Ads method with an Ad Account ID to retrieve an Ad ID.
Expand the Ad Leads Method Category and select the Copy this Category to create a Custom Object Category icon

Enter your Ad ID as the Object Name in the popup.
Select Copy.
A new Method Category will be created using the Ad ID as its name, e.g.:
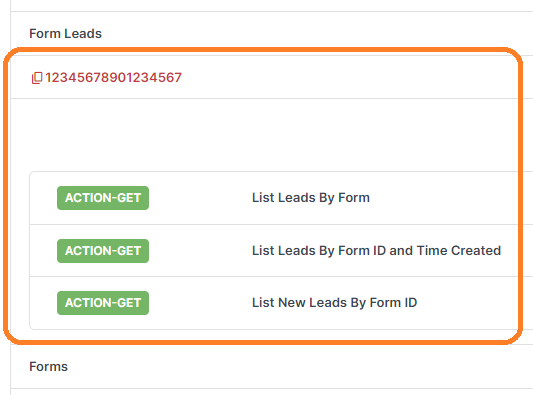
Form Leads
When creating a new Form Leads Method Category to work with a specific Form, you will need to obtain a Form ID as described here:
Use the Pages > List My Pages method to retrieve a Page ID.
Use the Forms > List Forms method with a Page ID to retrieve a Form ID.
Expand the Form Leads method category and select the Copy this Category to create a Custom Object Category icon
Enter your Form ID as the Object Name in the popup.
Select Copy.
A new Method Category will be created using the Form ID as its name, e.g.:
Create Ad Set "Promoted Object"
The Promoted Object is required for certain campaign objectives. The below table outlines the required Promoted Object fields based on the Optimization Goal.
Optimization Goal | Promoted Object Field |
|---|---|
CONVERSIONS |
|
PAGE_LIKES |
|
OFFER_CLAIMS |
|
LINK_CLICKS |
|
APP_INSTALLS |
|
OFFSITE_CONVERSIONS |
|
PRODUCT_CATALOG_SALES |
|
LEAD_GENERATION |
|