
Microsoft Azure Active Directory
Introduction
This guide explains how to setup Microsoft Azure for use with Cyclr, as well as installing a Microsoft Azure Active Directory Connector.
Setup & Authentication
Overview
If you intend for your customers to use a single application with the same set of permissions when they authenticate the Microsoft Azure Active Directory Connector in Cyclr, you can register a single application and set it’s details in your Cyclr Partner console.
If you intend for your customers to use their own application when they authenticate the Microsoft Azure Active Directory connector in Cyclr, they can register a single application and set it’s details when installing a a relevant template in Cyclr.
Remote Setup in Microsoft Azure - performed by Cyclr Partner
Go to your Microsoft Azure account and follow Microsoft’s guide here to register an application. Make sure to follow the Register application settings and Set application permissions sections below.
Remote Setup in Microsoft Azure - performed by your customer
Your customer should go to their Microsoft Azure account and follow Microsoft’s guide here to register an application. Make sure your customer follows Register application settings and Set application permissions sections below.
Register application settings
Use the following setting when creating an application:
When setting the Supported account types, select
Accounts in any organizational directory (Any Microsoft Entra ID tenant - Multitenant).When setting the Redirect URI (optional), enter your Cyclr service domain call-back URL. For example,
https://{{Your Cyclr service domain e.g. http://app-h.cyclr.com }}/connector/callback. Set Select a platform toWeb.
Set application permissions
From the Azure portal:
Select App registrations.
Select your application.
Select API permissions.
Select + Add a permission.
Select Microsoft Graph.
Select Delegated permissions.
Use the checkboxes to select the required permissions, the Microsoft Azure Active Directory requires the following permissions:
Category | Permissions |
|---|---|
Delta Queries | Group.Read.All, User.Read.All |
Groups | Group.Read.All, GroupMember.Read.All |
Organization | Organization.Read.All |
People | People.Read.All |
Places | Place.Read.All |
Users | User.Read.All |
In addition, select the following permissions:
offline_access,Directory.Read.All.Select Add permissions.
Select Grand admin consent for <application name>.
Select Yes.
Partner Setup in Cyclr Console
Having created an application within Microsoft Azure, go to your Cyclr Partner Console:
Select Connectors > Application Connector Library.
Select the Installation User Experience pencil icon next to the Microsoft Azure Active Directory Connector.
Select the Settings tab.
Enter the below values:
Property | Description |
|---|---|
Client ID | The Application (client) ID from your application. |
Client Secret | The Client secret from your application. |
Select Save.
If you leave these values blank, they must be provided each time the Connector is installed.
Cyclr Connector Installation
When installing the Microsoft Azure Active Directory Connector, the following values are used:
Property | Description |
|---|---|
Client ID | The Application (client) ID from your or your customer's application. |
Client Secret | The Client secret from your or your customer's application. |
Additional Information
Use Delta Query methods in Cycles
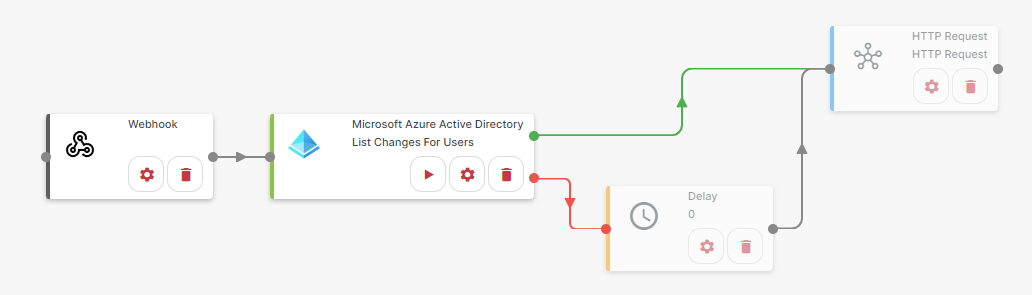
The Delta Query methods can be found under the Delta Queries method category. These methods make use of a $skiptoken to incrementally return changed records. Use the following process to implement these methods in a Cycle. From a template:
Add the following methods and Utility Connectors to the Cycle:
Tools > Delay
Utility Connectors > Quick Connector > HTTP Request
Utility Connectors > Event Triggers > Webhook
Application Connectors > Microsoft Azure Active Directory > Delta Queries > List Changes for Users/Groups
Connect them as follows:
For the Webhook step, select Step setup:
Paste the following JSON into the Paste JSON edit box:
JSON{ "$deltatoken": "string" }Copy the webhook URL.
Select Save.
For the List Changes For Users step, select Step setup:
Next to Delta Token, select
Webhookfrom the dropdown box. TheDelta Tokenvalue should automatically populate.Next to Select, select
Type a Valuefrom the dropdown box.Next to the Select edit box, enter the fields to both track changes for and to return.
Select Close.
For the Delay step, select Step setup:
Next to the Wait… edit box, enter the duration to wait between requests when no more records are returned from the API. The dropdown box can be used to change the unit of time.
Select Close.
For the HTTP Request step, select Step setup:
Set Method Type to
Post.In the Endpoint edit box, enter the webhook URL copied in step 3b.
Select the Add Method tab.
Paste the following JSON into the JSON Request edit box:
JSON{ "$deltatoken": "string" }Select Next.
Select Field Mapping.
Next to Deltatoken, select
List Changes For Usersfrom the dropdown box.From the dropdown box that appears, select
Delta Token.Select the Authenticate/Finish tab.
Select Create.
Select Close.
Select Run to start the Cycle.
From the HTTP Request step, select Test Step.
Select Run.
The Cycle will now being to make requests, the delay will be used any time no more records are returned from the API.