
Microsoft Dynamics CRM
Which Cyclr Connector to use?
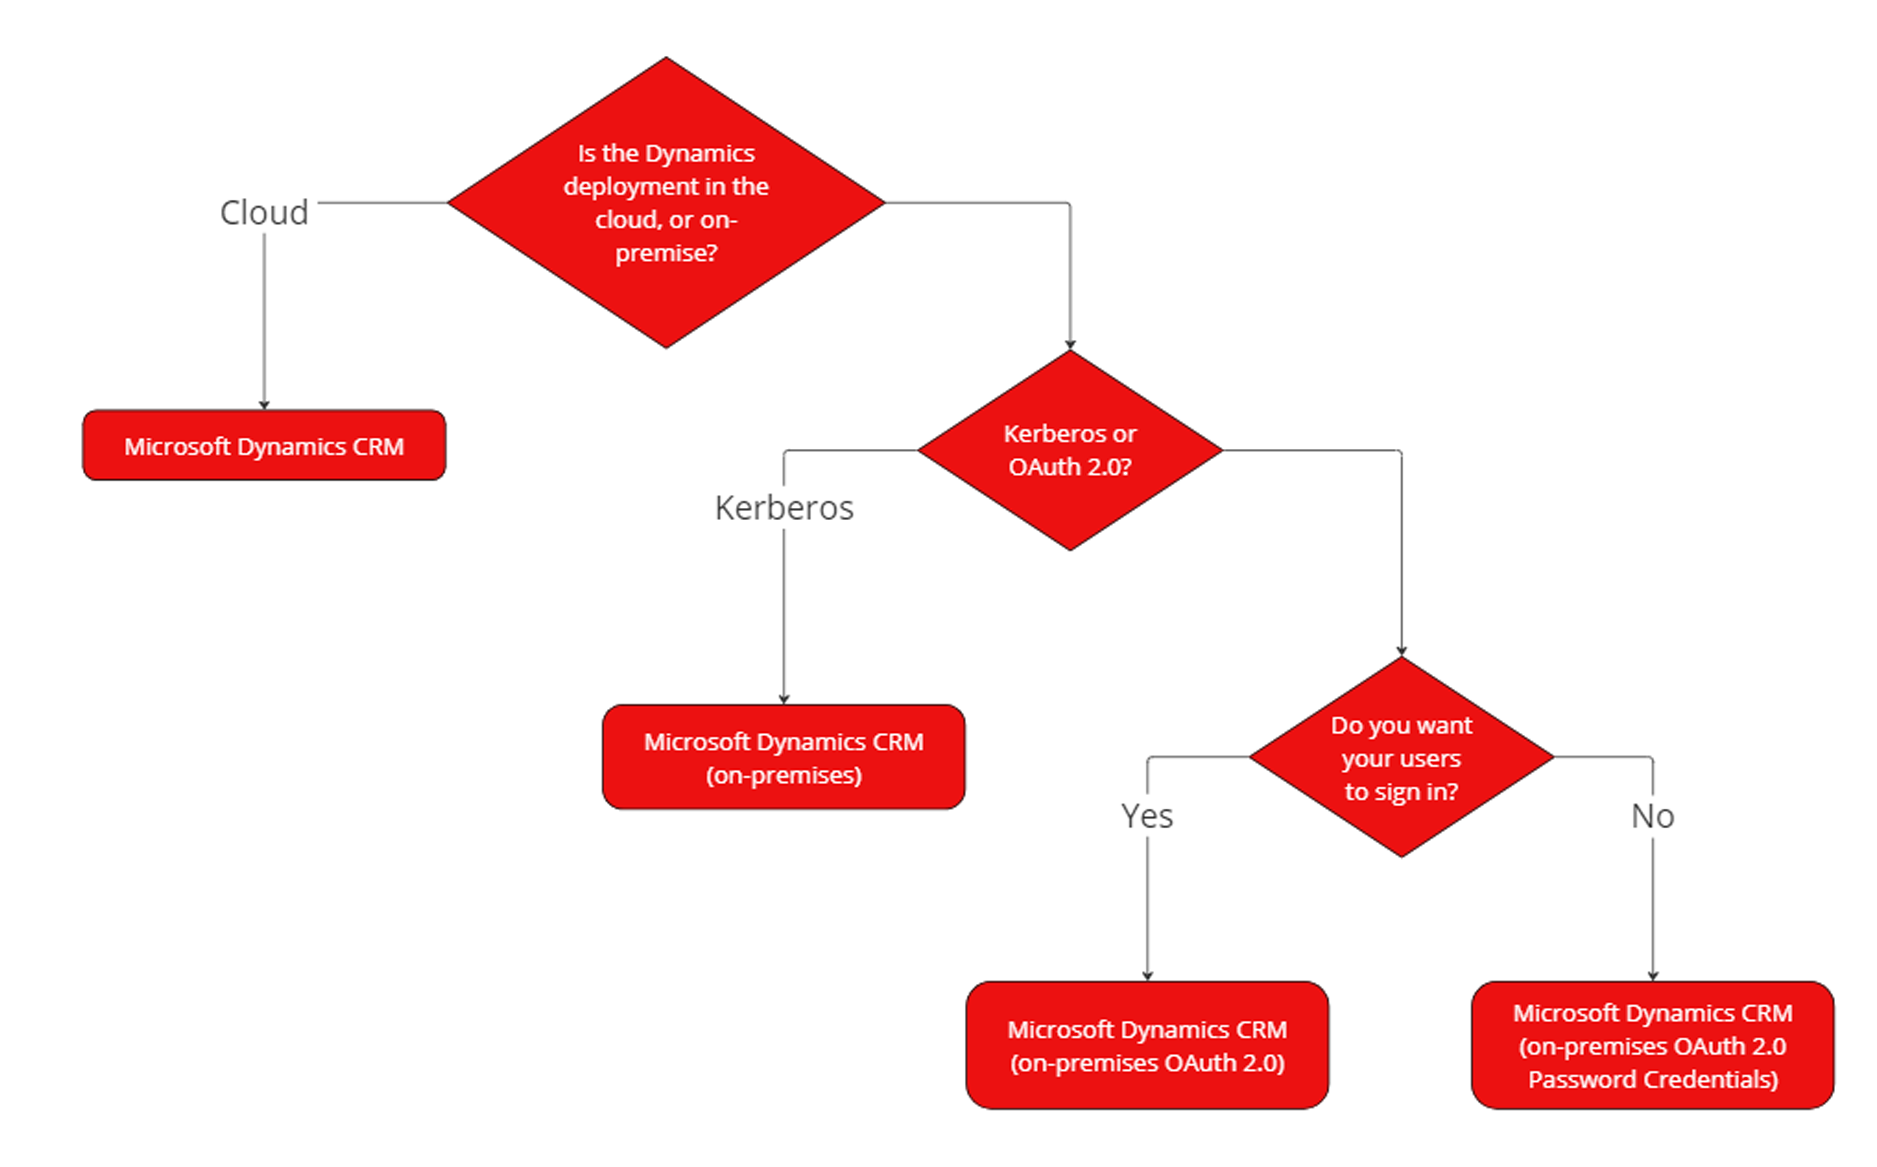
There are several Microsoft Dynamics CRM Connectors available in the Cyclr Application Connector Library. Which you use depends on a number of factors - the diagram below should help identify the appropriate one:
Setup
Prerequisites
To use a Microsoft Dynamics CRM connector, you need a Microsoft account and an Azure Active Directory application. For more information on how to create an application, see the Microsoft documentation.
To summarize how to create an application:
If you don't already have an account, register a free Azure account or Dynamics Online trial account.
Go to the Microsoft Azure portal, and select Azure Active Directory > App Registrations > New application.
Enter the details below:
Name: your application name.
Supported Account Types: select one of the Multitenant options.
Redirect URI: select Web and enter your cyclr callback URL (
https://{YourServiceDomain}/connector/callback)
From the Manage menu, select API Permissions > Add a permisssion. Select Dynamics CRM and check the box for user_impersonation.
Get authentication details.
Most of the Microsoft Dynamics CRM Connectors use OAuth2.0 so to connect with Cyclr, you need the Client ID and the Client Secret from the Microsoft Azure application.
The Client ID is the Application ID displayed in the Microsoft Azure portal.
You can create a Client Secret in the Microsoft Azure portal:
Go to Azure Active Directory > App Registrations > Your Application > Certificates & secrets.
Select Client Secrets > New Client Secret.
Copy the Value property.
Cyclr setup
To set up a Microsoft Dynamics CRM Connector in Cyclr, go to your Cyclr Partner Console:
Go to Connectors > Application Connector Library.
Use the search box to find the Microsoft Dynamics CRM connector.
Select the Installation User Experience icon and go to the Settings tab.
Enter the below values:
Resource: The domain of your Microsoft Dynamics CRM account URL. For example,https://example.crm.dynamics.com.
Client ID: The application ID from of the Microsoft application.
Client Secret: The corresponding Client Secret from the Microsoft application.Select Save Changes.
If you leave values blank, Cyclr asks for them when you install the connector.
This means you can use different settings for different accounts.
Additional Information
Install the connector using the Cyclr API
To install the Microsoft Dynamics CRM Connector with the Cyclr API as part of an automated process, you need to set the domain of the Dynamics CRM Online instance as follows before you get an authentication token.
Create an Account Connector Property named Resource and provide its value:
curl -X POST
     -H 'Content-Type: application/json'
     -H 'Accept: application/json'
     -d '{
            "Name": "Resource",
            "Value": "https://example.crm.dynamics.com"
         }'
'https://{CyclrAPIDomain}/v1.0/account/connectors/DYNAMICS_ACCOUNT_CONNECTOR_ID/properties'
After you successfully create the Account Connector Property, you can get a one-time sign-in token and call /UpdateAccountConnectorOAuth to complete the user challenge.
Errors
Error: AADSTS500011
If you encounter the error: AADSTS500011: The resource principal named [Resource URL] was not found in the tenant named [Tenant ID]. This can happen if the application has not been installed by the administrator of the tenant or consented to by any user in the tenant. You might have sent your authentication request to the wrong tenant.
Ensure you're using the correct Resource URL in the Connector's Setup. This is the URL of your customer's Microsoft Dynamics account and should be similar to "https://mycompany.crmXX.dynamics.com".
If unsure, go to your customer's Microsoft Dynamics account through a web browser and copy it from the address bar.
Error: AADSTS65001
Follow the below step if you are getting the error: AADSTS65001: The user or administrator has not consented to use the application with ID ” named ”. Send an interactive authorization request for this user and resource.
In your customer's Microsoft Azure portal, go to Azure Active Directory -> App registrations -> Your App name -> API permissions
Click the "Grant admin consent for ..." button to allow the app to be installed into their directory. If the button is greyed out, the user you are logged in as doesn't have the appropriate permission - you may require an administrator to do this.
Additional Filter Condition
Some methods provide the Additional Filter Condition field, which you can use to filter results. For more information, view the full MS Dynamics documentation.
For example, you can use operators:
and myCustomBool eq true
Operators must appear in lowercase:
andis validANDis not
Additional Fields To Return
Some methods provide the Additional Fields To Return field, which you can use to return additional data.
For example, to tell the API to return a custom response field, add the custom field to Additional Fields To Return. If you wish to add more than one field, use a comma separated list.
“List Deleted” Connector Methods
To be able to use the List Deleted Connector Methods such as List New Deleted Accounts and List New Deleted Contacts, Auditing must be enabled within Microsoft Dynamics for the organization.
Microsoft’s on-premises documentation relating to Auditing can be found here.
These particular sections from that documentation describe the steps to take: