
HubSpot
Introduction
This guide will take you through how to setup HubSpot for use with Cyclr.
Setup & Authentication
Remote Setup
To connect Cyclr with the HubSpot API, you need to create an app within HubSpot, as detailed below:
A Cyclr Partner can complete this once. Your client/customer doesn’t need their own separate app within HubSpot.
Login to the HubSpot Developer Portal here.
Follow the HubSpot documentation to create an application.
The
Authtab shows aClient IDandClient Secret. Make a note of these to use in Cyclr’s connector setup.Get the redirect URL that creates the link between your Cyclr Console and HubSpot. The URL is shown on the page where you enter the Client ID and Client Secret, and has the form:
https://[Your Cyclr Service Domain]/connector/callbackSet the scopes of your HubSpot App based on the method categories you plan to use. You can find a list of scopes and the permissions they provide here. By default, the HubSpot installation in Cyclr requests the following scopes:
crm.objects.contacts.readcrm.objects.contacts.write
Starting from October 2024, HubSpot will require you to specify which scopes in your app are "Required" and which are "Optional". It is essential that the settings in your connector match the settings in your OAuth app exactly. Any mismatch in these details will cause authentication to fail.
Permissions
In order to use the Products and Line Items methods, you need to assign the user a paid Sales Hub seat within HubSpot.
Cyclr Partner Console Setup
You can install the connector with the credentials obtained in the above steps:
Field | Description |
|---|---|
Client ID | The client ID of your HubSpot OAuth app. |
Client Secret | The secret of your HubSpot OAuth app. |
Scopes | A space separated list of permissions that your HubSpot OAuth app needs access to. You need to enable these on your HubSpot OAuth app or connector authentication fails. By default, Cyclr will request the following scopes: |
Optional Scopes | A space separated list of optional permissions that your HubSpot OAuth app needs access to. If you don’t enable these on your HubSpot OAuth app, Cyclr doesn’t request them and it can reduce functionality. By default, Cyclr requests the following optional scopes: |
You are then prompted to log in, select your HubSpot, and authorize access to the connector.
Account selection
When you authenticate the HubSpot connector and sign into HubSpot, it presents the user with the HubSpot Choose an Account screen.
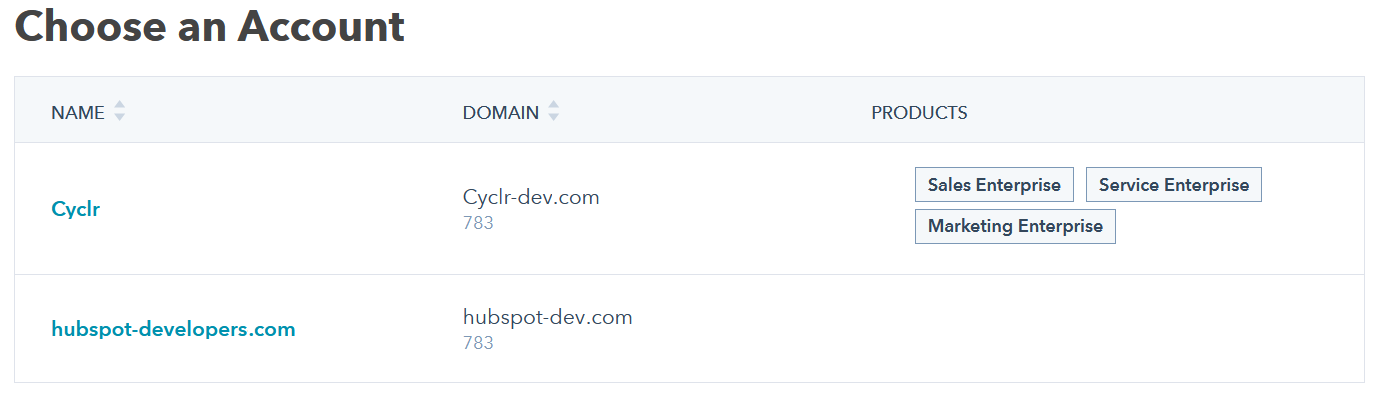
To test, select your main HubSpot account instead of your developer account. To identify the main account, look for the account with items shown under the PRODUCTS heading.
In the above example, that would be account with a Name of “Cyclr”.
Additional Information
Webhook setup
HubSpot webhooks utilize a single webhook URL, which requires some configuration of your HubSpot application.
Navigate to your Cyclr Console > Connectors > Application Connector Library > Hubspot > Setup.
Copy the Webhook URL to your clipboard. For example,
https://<yourservicedomain>/api/partnerwebhook/xxxxxx.Note: Don't use the webhook URL from the builder. Make sure to get the URL from under the partner console.
To send webhooks, you need to setup the HubSpot application:
Enter the URL.
Alter scopes to select the events to subscribe to.
Activate the events.
Enter the URL
Navigate to the HubSpot Developers App Dashboard, and select the application you use with Cyclr.
Within the application, navigate to Webhooks.
Paste the Webhook URL from your clipboard, into the target URL.
Select Save (at the bottom of the screen).
Scopes
To set up your subscriptions, you might need to alter the scopes of the HubSpot application to allow the events to send. For more information, see HubSpot's documentation on webhook scopes.
Select Create Subscription.
Choose the objects and events that you wish to send to Cyclr.
Select Subscribe.
Activate the events
Under event subscriptions, hover over the line with your mouse to show the view subscriptions button and select the button.
Hover over the line with your mouse to show the activate button, and select this button to activate the sending of the webhook.
Add webhooks to your cycle or template
Drag the Webhook step from the sidebar into the builder.
Connect the Webhook to another step.
Select Run to start the cycle.
Use custom objects
Create a custom object schema
To create custom object categories in the HubSpot connector, you need a custom object schema. HubSpot allows you to create custom object schema on the Custom objects page of their documentation. You can create custom object schema on the Object schema tab under Create a new schema.
Create a custom object method category
You can also create a custom object method category.
Go to the HubSpot connector Settings page:
For template connectors: Cyclr Console > Templates > Template Connectors > HubSpot > Edit Connector.
For connectors within a cycle: Cycle Builder > Application Connectors > HubSpot > Settings.
Under the Methods and Fields heading, expand the Custom Objects category.
Select the red Copy this Category to create a Custom Object Category icon.
Use the drop-down menu and select the custom object schema to use for the custom object method category.
Select Copy.
The new category then uses the custom object schema selected for all methods.