
Tools
Introduction
Cyclr provides a number of general tools you can use in your Templates and Cycles and that aren’t related to specific Connectors.
They are:
Tool | Purpose |
|---|---|
Allows data to be split to follow different paths through an integration. | |
Allows a pause to be added to an integration. | |
Allows you to pause processing of a Transaction until a specific data/time has been reached. | |
Allows you to add some “clean-up Steps” or to perform a task once after processing of other items has been completed, perhaps when processing a list of items that use Collection Splitting. | |
Allows you to annotate your integrations and make notes in the Builder. | |
Similar to a Decision Step, but allows data to be split into multiple different “cases” to follow separate paths through an integration. |
Decisions
Decision steps are used to split the data in your integrations and to send it separately down a True or False branch.
Setting up a Decision step
Decisions work by comparing a Left Operand to a Right Operand; in other words, it looks for a value in your data and compares it - using a condition you specify - to another value.
Click and drag a Decision Step into your cycle and connect it where you wish to split the data, then click its cog Step Setup button.
From within the Decision Step’s Step Setup:
Choose a previous step and one of its fields; this is your Left Operand.
Choose a Condition from the dropdown, such as:
Exists,Not Exists,Equals,Not Equals.Choose your Right Operand. This can be the value of a previous step’s field or a value you enter.
In the screenshot example below, the fields would be:
Left Operand: Name
Condition: Equals
Right Operand Smith

The result is that contacts with the last name of “Smith” are routed down the Decision Step’s True branch, and all other contacts will go down the False branch.
To create more advanced logic, you can chain multiple Decision steps together.
IMPORTANT NOTE
Decision steps only filter the data on Steps they reference. Take the example illustrated below:
Step 3 has fields mapped from Step 1 and Step 2.
Only Step 2’s results are being filtered by a decision step.
Any data from Step 1 will always reach Step 3, regardless of the results of Step 2 and filtering on the Decision Step.

Delay
Using a Delay Step allows you to introduce a pause when Cyclr executes a Transaction. This can be useful to perhaps wait a few minutes for an external system to complete a separate task, or when giving a customer a few days to respond to an email that’s been sent before performing a follow-up action.
You can either set a fixed delay on the Step, or map an amount of time from a previous Step to vary the delay.
If you choose to map from a Field in a list, Cyclr will automatically perform Collection Splitting on the Step the list is from. See this section for more information.
To set up a Delay:
Drag in Delay from the Tools section of the Builder’s right sidebar.
Connect the Delay Step between two other Steps.
Select the Step Setup icon
In the popup, either enter a numeric value using “Type a Value” to apply a fixed delay, or map from a previous Step’s Response Field which must contain an integer.
Select a unit of time from the dropdown.
Available options are:Seconds
Minutes
Hours
Days
Weeks
Wait Until
A Wait Until Step is similar to a Delay Step, but rather than wait a set amount of time - such as 10 minutes - before moving a Transaction on to the next Step, a Wait Until Step holds the Transaction until a specified point in time has passed.
Wait for a specific date/time
For example, you can set a step to wait until the date of an event or webinar you are running.
In the Step Setup popup, select the Type a Value option and choose a date/time using the calendar and dropdown combination.
Wait until a dynamic date/time contained in your data
For example, you can set it to a variable such as a contact’s subscription renewal date.
In the Step Setup popup, use the dropdowns to select a previous Step, then a Field from that Step. The Field you select must contain a date/time value.
If you choose to map from a Field in a list, Cyclr will automatically perform Collection Splitting on the Step the list is from. See this section for more information.
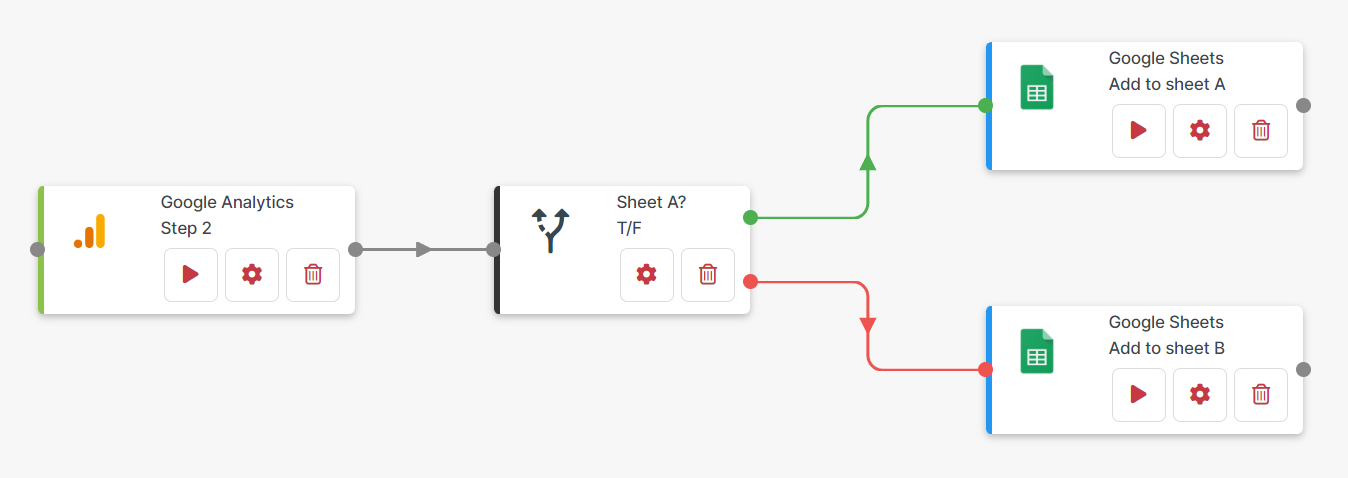
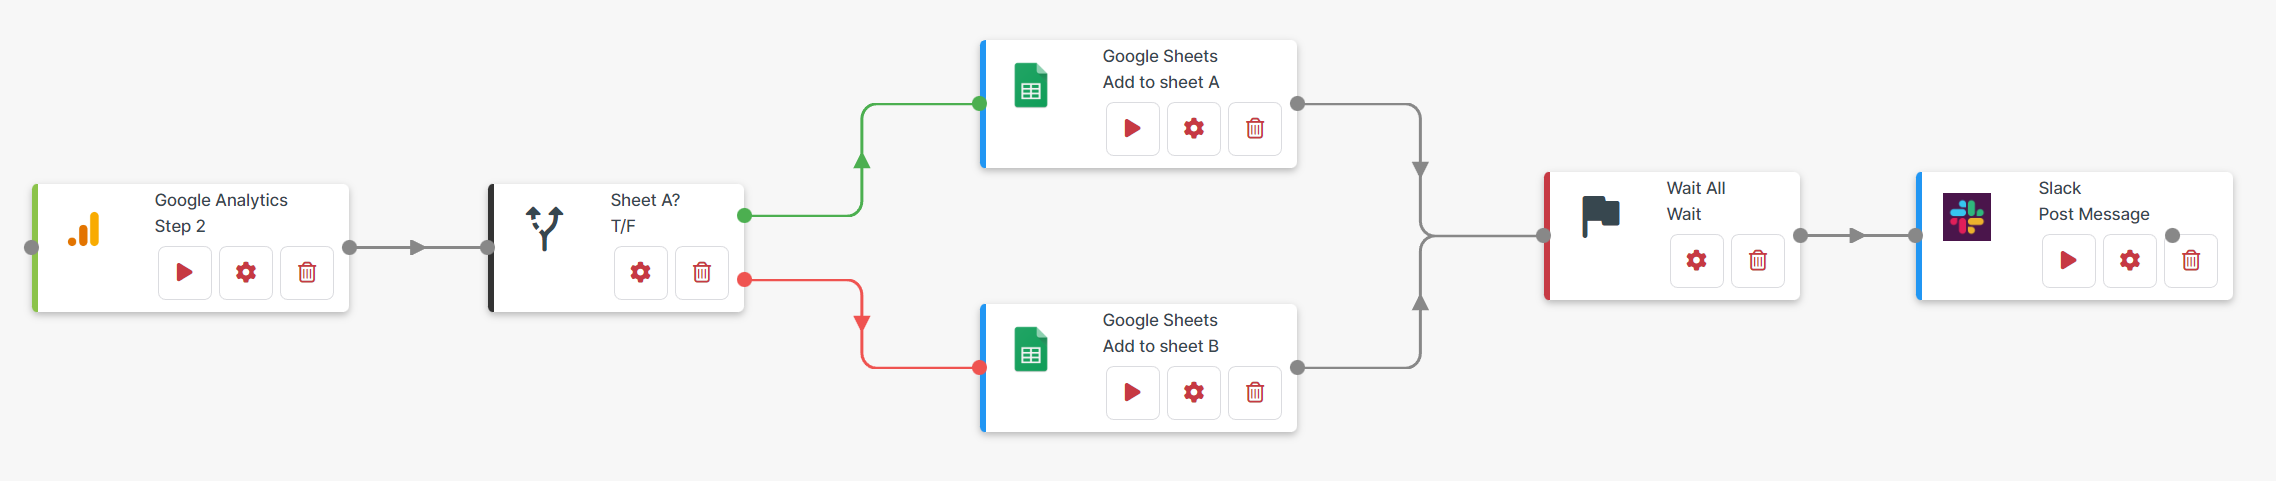
Wait All
A Wait All Step waits for all Transactions running in a Cycle to complete before moving on and executing the Steps that appear after it.
This can be useful when working with Collection Splitting where multiple Transactions are moving independently through a Cycle and there are Steps you wish to run after they’ve completed.
Shortly after all “In Progress” Transactions have completed in a Cycle, a single new Transaction is created on the Wait All Step to execute any remaining Steps placed after it.
In the example below, the integration splits data from Google Analytics into individual transactions that contain data to add to either sheet A or B in Google Sheets. The Wait All step ensures that the integration only posts a Slack message once the integration completes all of the transactions.
Notes on use
Wait All Steps consider the first Step in a Cycle to be important as they typically retrieve the data that will be processed. If the first Step in a Cycle fails to execute successfully, Cyclr won’t continue from the Wait All Step as a result.
Avoid setting your Cycle to run too frequently as the Wait All Step only continues once there are no “In Progress” Transactions running on the Cycle, regardless of when and how they were started.
A Wait All Step effectively splits a Cycle into 2 parts: Steps that come before the Wait All and Steps that come after it. Because of this, Steps placed after a Wait All are not able to map from Steps that come before it.
You don’t need to connect all Steps to a Wait All to have it fire. Decision Steps and Methods that have True and False Exits can’t prevent a Wait All functioning by not linking their Exits to it. The Wait All will still fire once all “In Progress” Transactions have been completed.
Annotation
These Steps allow you to document your integrations.
Editing an Annotation Step lets you enter text that could explain a particularly involved part of an integration or give an overview to your colleagues so they can easily understand its purpose and how it functions.
Switch
Switch Steps allow you to send data down different routes of your integration according to the value found in a particular field. It’s similar to having multiple Decision Steps that check the same field for different values.
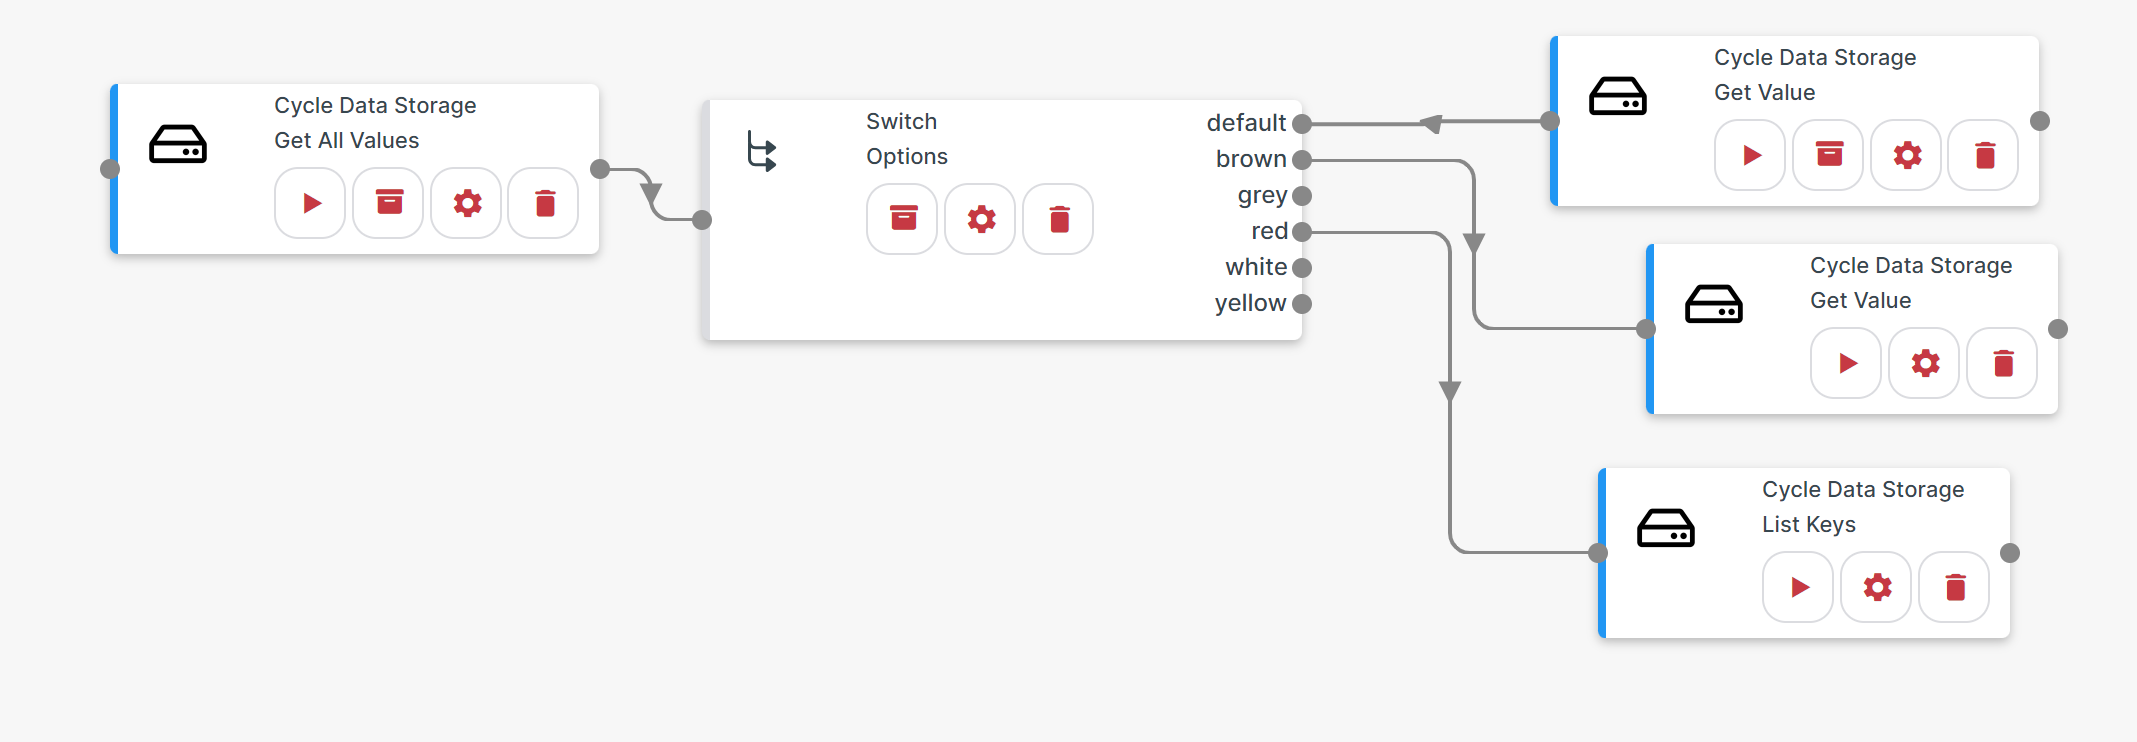
Setting up a Switch step
Switches work by comparing a Left Operand to the Cases specified using an equality condition; in other words, it looks for a value in your data and compares it with the cases using an equality condition. If the data matches one of the cases specified, that path will be followed down the branch but if not, the default path is followed.
The text matching performed between the Left Operand and Cases is case-insensitive so uppercase and lowercase differences are ignored, e.g.:
a Left Operand value of Example , EXAMPLE and eXaMpLe would all match a Case of example.
Click and drag a Switch Step into your cycle and connect it where you wish to split the data, then click its Step Setup button.
From within the Switch’s Step Setup:
Choose an previous Step from the Source dropdown, then a choose from the Field dropdown; this is your Left Operand.
Add a new Case.
Notice there is an existing case added to your step called default.
In the screenshot example below, the fields would be:
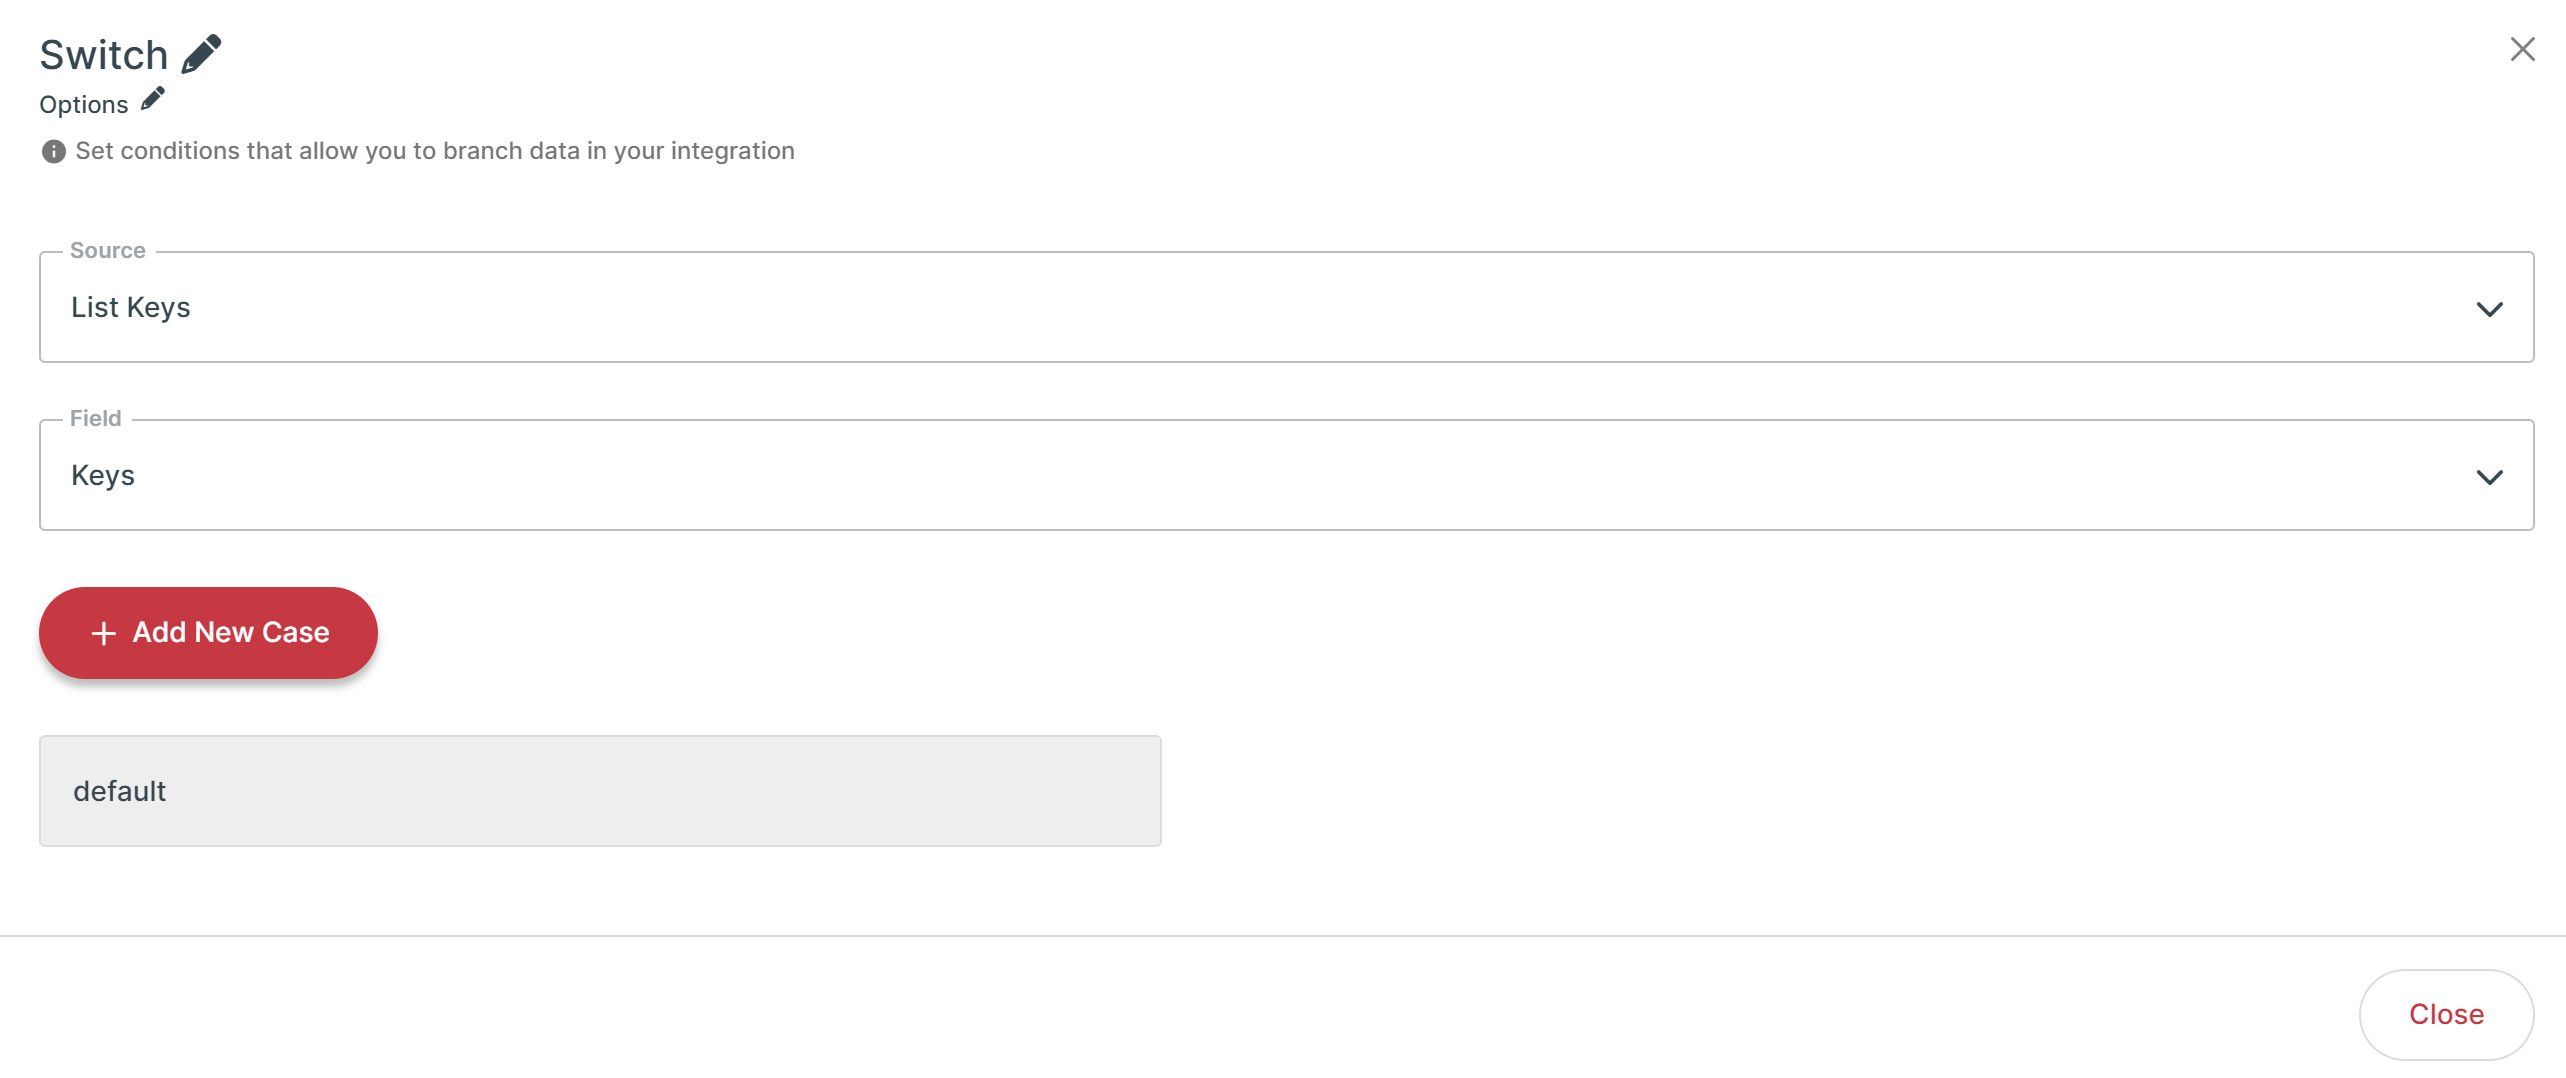
For all data not matched with the cases specified, the default path is followed.
Mapping on a Delay Step or a Wait Until Step
When using Delay Steps or Wait Until Steps, you can either use the “Type a Value” option and provide a fixed value for Cyclr to use, or you can map from a previous Step to provide a value that changes depending on your data.
When mapping a value from a previous Step onto a Delay Step or a Wait Until Step, if the value comes from a list of data, Cyclr will automatically perform Collection Splitting on that list.
The reason for this is that each item in the list could have a different amount of time to wait so each must be handled as a separate Transaction to be processed correctly.